Is your printer not printing black ink? Learn how to fix printer not printing black with our simple, step-by-step troubleshooting guide. Works for HP, Canon, Epson & more.


Is your printer not printing black even though the ink is full? Don’t worry — this is one of the most common printer issues reported by users in the U.S., especially for HP, Canon, Brother, and Epson models.
This detailed guide will walk you through how to fix printer not printing black, covering basic to advanced troubleshooting methods to get your device working again — fast.
There are several reasons your printer might not be printing black ink:
Let’s now go through how to fix each of these issues step-by-step.
Sometimes, printers give false readings — but it’s still worth checking if your black ink cartridge is empty. Replace it with a new, genuine cartridge if levels are low.
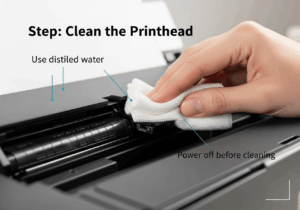
A clogged printhead is one of the main reasons your printer won’t print black.
If the automated cleaning fails:
📝 Tip: Always power off the printer before manual cleaning.
Improper installation can trigger ink flow issues. Remove the black cartridge, clean the contacts with a dry cloth, and reinstall it carefully. Use OEM cartridges, not third-party refills for best results.
🔗 Epson Cartridge Replacement Guide (DoFollow)
Outdated drivers may prevent proper ink usage.
Incorrect settings may cause your printer to skip black ink.
Sometimes, a simple reset can resolve firmware glitches that block black ink from printing.
📝 This resets the internal memory and clears software bugs.
Run a print test from your printer menu or via PC to isolate if it’s a hardware or software issue.
A faulty cable or connection might cause interrupted commands.
If your printer is not printing black, try the above fixes before rushing to buy a new one. From cleaning printheads to updating drivers and resetting your printer — these solutions cover every angle.
Need more help? Check your printer’s user manual or visit the brand’s official support page for your model.